[React] 실전형 리액트 Hooks 10
📌 React Hooks
- useInput
- useTabs
- useTitle
- useClick
- useConfirm & usePreventLeave
- useBeforeLeave
- useFadeln & useNetwork
- useScroll & useFullscreen
- useNotification
- useAxios
💡Nomad Coders 에서 진행한 총 10가지의 custom hooks 에 대한 정리 모음집입니다.
들어가기에 앞서, useState 와 useEffect에 대해 알아보자
📌 useState
함수형 컴포넌트 내부에서 상태를 정의하고, 이 상태를 관리할 수 있게 해주는 훅이다.
- 넘겨진 인수가 없는 경우 초기값은 undefined 다.
- const[state, setState] = useState(initialState) 에서 첫 번째 원소는 state 값 자체를 사용할 수 있고, 두 번째 원소는 setState 함수를 사용하여 state의 값을 변경할 수 있다.
import React, { useState } from "react";
import ReactDOM from "react-dom";

const Counter = () => {
  // useState 훅을 사용하여 count 상태와 setCount 업데이트 함수를 생성한다.
  const [count, setCount] = useState(0);

  return (
    <div>
      <h2>Counter</h2>
      <p>Count: {count}</p>
      <!-- 버튼을 클릭하면 setCount를 호출하여 count를 증가시킨다. -->
      <button onClick={() => setCount(count + 1)}>Increase Count</button>
    </div>
  );
};

const App = () => {
  return (
    <div className="App">
      <Counter />
    </div>
  );
};

const rootElement = document.getElementById("root");
ReactDOM.render(<App />, rootElement);
📌 useEffect
useEffect는 컴포넌트가 렌더링된 후에 어떠한 부수 효과(Effect)를 일으키고 싶을 때 사용하는 Hook이다.
- 두 개의 인수를 받는데, 첫 번째로 callback 두 번째로 Dependency Array를 받는다. 두 번째 값이 변경되면 첫 번째 인수인 callback 을 실행한다.
- 두 번째에 빈 배열을 넣으면 컴포넌트가 마운트 될 때만 실행한다.
- 비교할 의존성이 없다고 판단하여 최조 렌더링 후 더 이상 렌더링이 되지 않는다.
- 클린업 함수를 반환 할 경우, 클린업 함수는 컴포넌트가 언마운트될 때 실행된다.
import React, { useEffect, useRef } from "react";
import ReactDOM from "react-dom";

const MouseTracker = () => {
  const mousePosition = useRef({ x: 0, y: 0 });

  const handleMouseMove = (event) => {
    mousePosition.current = {
      x: event.clientX,
      y: event.clientY,
    };
  };

  useEffect(() => {
    const updateMousePosition = (event) => {
      handleMouseMove(event);
    };

    document.addEventListener("mousemove", updateMousePosition);

    // 클린업 함수 정의
    return () => {
      document.removeEventListener("mousemove", updateMousePosition);
    };
  }, []);

  return (
    <div>
      <h2>Mouse Tracker</h2>
      <p>X: {mousePosition.current.x}, Y: {mousePosition.current.y}</p>
    </div>
  );
};

const App = () => {
  return (
    <div className="App">
      <MouseTracker />
    </div>
  );
};

const rootElement = document.getElementById("root");
ReactDOM.render(<App />, rootElement);
다음의 코드는 클린업 함수를 정의한 코드인데, 여기서 클린업 함수는 새로운 값을 기반으로 렌더링 뒤에 실행되지만 새로운 값이 아닌 함수가 정의되었을 당시에 선언된 이전 값을 보고 실행이 된다.
즉, 이벤트를 추가하기 전 이전에 등록했던 이벤트 핸들러를 삭제하는 코드를 클린업 함수에 추가하여 특정 이벤트의 핸들러가 무한히 추가되는 것을 방지할 수 있다.
| 언마운트(Unmount) | 클린업(Cleanup) |
| 특정 컴포넌트가 DOM에서 제거되는 것 | 함수형 컴포넌트가 리렌더링됐을 때 의존성 변화가 있었을 당시 이전 값 기준으로 실행되는 것 |
📌 useInput
import React, { useState } from "react";
import ReactDOM from "react-dom";
const useInput = (initialValue) => {
  const [value, setValue] = useState(initialValue);
  const onChange = (e) => {
    console.log(e.target);
  };
  return { value, onChange };
};

const App = () => {
  const name = useInput("Mr.");
  return (
    <div className="App">
      <h1>Hello</h1>
      <input placeholder="Name" {...name}></input>
    </div>
  );
};
const rootElement = document.getElementById("root");
ReactDOM.render(<App />, rootElement);
> useInput에서는 초기값을 설정할 수 있으며, input 태그의 값을 변경 가능하다.
const[value, setValue] = useState(initialValue) 는 App 함수에서 "Mr."라는 인자 값을 가져온 후 initialValue에 초기값을 설정해준다.
input 에 있는 값을 변경하기 위해서는 onChange 를 이용하면 된다. onChange 함수의 e.target을 통해 변화하는 내용을 감지하여 value가 바뀌는 것이다. 변경되는 value 값을 setValue에서 상태가 변화게 되며 최종적으로 setValue(value)의 값이 넘겨지게 되는 것이다.
*주의) return value 가 아닌, return {value} 로 한 것은 object을 리턴했기 때문이다. 이는 return {value:value} 와 동일하다.
📌 useTabs
import React, { useState } from "react";
import ReactDOM from "react-dom";

const content = [
  {
    tab: "Section 1",
    content: "I'm the content of the Section 1",
  },
  {
    tab: "Section 2",
    content: "I'm the content of the Section 2",
  },
];
const useTabs = (initialTab, allTabs) => {
  const [currentIndex, setCurrentIndex] = useState(initialTab);
  if (!allTabs || !Array.isArray(allTabs)) {
    return;
  }

  return {
    currentItem: allTabs[currentIndex],
    changeItem: setCurrentIndex,
  };
};
const App = () => {
  const [currentItem, changeItem] = useTabs(0, content);
  return (
    <div className="App">
      {content.map((section, index) => (
        <button onClick={() => changeItem(index)}>{section.tab}</button>
      ))}
      <div>{currentItem.content}</div>
    </div>
  );
};
const rootElement = document.getElementById("root");
ReactDOM.render(<App />, rootElement);
React Hook "useState" is called conditionally. React Hooks must be called in the exact same order in every component render. Did you accidentally call a React Hook after an early return?
위와 같은 에러가 떴을 때 아래와 같이 useState()를 최상단으로 이동시켜주시면 됩니다.
*최상위(at the Top Level)에서만 Hook을 호출해야 합니다.
(출처:sugar)
> 버튼을 클릭 시 content가 바뀌는 기능이다.
📌 useTitle
import React, { useEffect, useState } from "react";
import ReactDOM from "react-dom";

const useTitle = (initialTitle) => {
  const [title, setTitle] = useState(initialTitle);
  const updateTitle = () => {
    const htmlTitle = document.querySelector("title");
    htmlTitle.innerText = title;
  };
  useEffect(updateTitle, [title]);
  return setTitle;
};
const App = () => {
  const titleUpdater = useTitle("Loading..."); // useTitle에서 setTitle()이란 함수를 return 해주고 있음
  setTimeout(() => titleUpdater("Home"), 5000);
  return (
    <div className="App">
      <h1>Hi</h1>
    </div>
  );
};
const rootElement = document.getElementById("root");
ReactDOM.render(<App />, rootElement);
> title 태그에 해당하는 초기 값을 변경하는데 사용된다.
useTitle은 initalTitle이란 초기 값(="Loading...")을 인자로 받아 실행된다.
document.querySelector("title") 를 사용하여 HTML에서 <title> 태그를 선택하고 이 태그의 innerText를 현재 title 상태로 설정한다.
useEffect(updateTitle, [title]) 를 사용하여 title의 상태가 변경될 때 마다 updateTitle 함수를 실행하며 [title] 를 전달하여 title이 변경될 때마다 useEffect가 실행된다. 최종적으로 useTitle 훅은 setTitle 함수를 반환한다.
setTimeout() 함수를 사용하여 5초 후에 titleUpdater("Home")을 호출한다.
📌 useClick
useClick
import React, { useEffect, useRef, useState } from "react";
import ReactDOM from "react-dom";

const useClick = (onClick) => {
  const element = useRef();
  useEffect(() => {
    if (typeof onClick !== "function") {
      return;
    }
    if (element.current) {
      element.current.addEventListener("click", onClick);
    }
    return () => {
      if (element.current) {
        element.current.removeEventListener("click", onClick);
      }
    };
  }, []);
  return typeof onClick !== "function" ? undefined : element;
};
const App = () => {
  const sayHello = () => console.log("say Hello");
  const title = useClick(sayHello);
  return (
    <div className="App">
      <h1 ref={title}>Hi</h1>
    </div>
  );
};
const rootElement = document.getElementById("root");
ReactDOM.render(<App />, rootElement);
> useClick 함수를 통해 클릭 이벤트를 처리한다.
useClick 훅은 useEffect(()=>{},[]) 를 사용하여 클릭 이벤트를 추가하고 제거한다. useRef를 사용하여 DOM 요소에 대한 참조를 유지한다.
App 컴포넌트를 보면, h1 태그에 클릭 이벤트를 추가하고 클릭 이벤트가 발생할 때 마다, "say Hello" 가 콘솔에 찍히게 된다.
* 주의할 점 ) useEffect() 함수 다음, return typeof를 삼항 연산식을 설정해야 문법 에러가 발생하지 않는다.
📌 useConfirm & usePreventLeave
useConfirm
import React, { useEffect, useRef, useState } from "react";
import ReactDOM from "react-dom";

const useConfirm = (message = "", callback, rejection) => {
  if (typeof callback !== "function") {
    return;
  }
  const confirmAction = () => {
    if (window.confirm(message)) {
      callback();
    } else {
      rejection();
    }
  };
  return confirmAction;
};

const App = () => {
  const deleteWorld = () => console.log("Deleting the world");
  const abort = () => console.log("Aborted");
  const confirmDelete = useConfirm("Are you sure", deleteWorld, abort);
  return (
    <div className="App">
      <button onClick={confirmDelete}>Delete the world</button>
    </div>
  );
};
const rootElement = document.getElementById("root");
ReactDOM.render(<App />, rootElement);
> confirm(Yes/No)기능을 제공한다.
App 컴포넌트에서 button 태그에서 클릭 이벤트가 발생하면 useConfirm() 함수를 호출한다.
confirmAction() 함수에서 window.confirm(message) 가 true 인 경우 callback() false 인 경우 rejection()을 호출하게 된다.
usePreventLeave
import React, { useEffect, useRef, useState } from "react";
import ReactDOM from "react-dom";

const usePreventLeave = () => {
  const listener = (event) => {
    event.preventDefault();
    event.returnValue = "";
  };
  const enablePrevent = () => window.addEventListener("beforeunload", listener);
  const disablePrevent = () =>
    window.removeEventListener("beforeunload", listener);
  return { enablePrevent, disablePrevent };
};
const App = () => {
  const { enablePrevent, disablePrevent } = usePreventLeave();
  return (
    <div className="App">
      <button onClick={enablePrevent}>Protect</button>
      <button onClick={disablePrevent}>Unprotect</button>
    </div>
  );
};
const rootElement = document.getElementById("root");
ReactDOM.render(<App />, rootElement);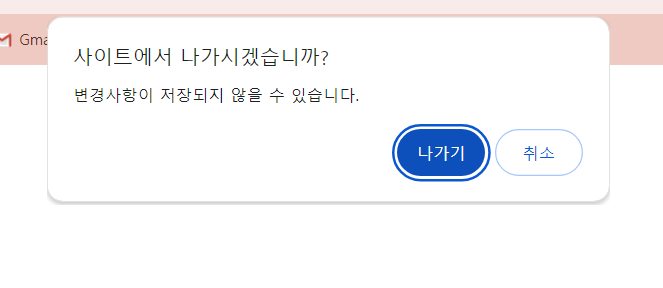
> 다음과 같이 창을 닫으려고 할 때, alert을 띄워줄 수 있다. (활성화/비활성화 모드 전환이 가능하다)
App 컴포넌트에서 Protect version 과 Unprotect version 의 button 태그를 선택하여 클릭 이벤트를 발생시킬 수 있다.
enablePrevent() 함수를 호출하는 경우, listener 가 이벤트를 감지하여 window 가 닫히기 전 function 을 실행 여부를 판단한다.
📌 useBeforeLeave
import React, { useEffect } from "react";
import ReactDOM from "react-dom";

const useBeforeLeave = (onBefore) => {
  const handle = (event) => {
    const { clientY } = event;
    if (clientY <= 0) {
      onBefore();
    }
  };
  useEffect(() => {
    if (typeof onBefore === "function") {
      document.addEventListener("mouseleave", handle);
      return () => document.removeEventListener("mouseleave", handle);
    } else {
      return;
    }
  }, []);
};

const App = () => {
  const begForLife = () => console.log("Pls dont leave");
  useBeforeLeave(begForLife);
  return (
    <div className="App">
      <h1>Hello</h1>
    </div>
  );
};
const rootElement = document.getElementById("root");
ReactDOM.render(<App />, rootElement);
> 마우스가 화면을 벗어날 때 마다 다음과 같이 이벤트를 발생시킬 수 있다.
clientY 의 값이 마이너스 인 경우 (= 마우스가 위로 벗어난 경우) onBefore() 함수를 호출한다.
useEffect를 사용하기 때문에, addEvent를 생성한 후 return 값으로 remoteEvent를 정의해준다. Dependency Array는 빈값으로 설정하며 컴포넌트가 마운트 될 때마다 렌더링이 된다.
* 주의할 점 ) if(typeof ~) 조건절은 useEffect() Hook 밖이 아닌 안에서 진행된다.
📌 useFadeIn & useNetwork
useFadeIn
import React, { useEffect, useRef } from "react";
import ReactDOM from "react-dom";

const useFadeIn = (duration = 1, delay = 0) => {
  const element = useRef();
  useEffect(() => {
    if (typeof duration === "number" || typeof delay === "number") {
      if (element.current) {
        const { current } = element;
        current.style.transition = `opacity ${duration}s ease-in-out ${delay}s`;
        current.style.opacity = 1;
      }
      return;
    }
  }, []);
  return { ref: element, style: { opacity: 0 } };
};
const App = () => {
  const fadeInH1 = useFadeIn(2, 2);
  const fadeInP = useFadeIn(5, 10);
  return (
    <div className="App">
      <h1 {...fadeInH1}>Hello</h1>
      <p {...fadeInP}>lorem ipsum lalalalal</p>
    </div>
  );
};
const rootElement = document.getElementById("root");
ReactDOM.render(<App />, rootElement);
> 서서히 자연스럽게 나타나는 효과를 줄 수 있다. 애니메이션 효과 !!
opacity 는 불투명도를 의미하고, ease-in-out는 부드럽게 서서히 등장하는 것이다.
ease-in-out${delay}s 라 정의를 하면, delay 초만큼 기다렸다가 서서히 등장한다.
return {ref: element, style:{opacity:0}} 을 보면 처음에는 opacity이 0이었다가 fadeInH1의 useFadeIn() 함수가 호출되면서 0에서 2로 불투명도가 변화한다. 또한 ease-in-out의 delay 값이 2로 설정된다.
useNetwork
import React, { useEffect, useState } from "react";
import ReactDOM from "react-dom";
const useNetwork = (onChange) => {
  const [status, setStatus] = useState(navigator.onLine);
  const handleChange = () => {
    if (typeof onChange === "function") {
      onChange(navigator.onLine);
    }
    setStatus(navigator.onLine);
  };
  useEffect(() => {
    window.addEventListener("online", handleChange);
    window.addEventListener("offline", handleChange);
    () => {
      window.removeEventListener("online", handleChange);
      window.removeEventListener("offline", handleChange);
    };
  }, []);
  return status;
};
const App = () => {
  const handleNetworkChange = (online) => {
    console.log(online ? "We just went online" : "We are offline");
  };
  const onLine = useNetwork(handleNetworkChange);
  return (
    <div className="App">
      <h1>{onLine ? "Online" : "Offline"}</h1>
    </div>
  );
};
const rootElement = document.getElementById("root");
ReactDOM.render(<App />, rootElement);
> 네트워크를 online/offline 로 설정할 수 있다.
📌 useScroll & useFullscreen
useFullscreen
import { elementType } from "prop-types";
import React, { useEffect, useRef, useState } from "react";
import ReactDOM from "react-dom";

const useFullscreen = (callback) => {
  const element = useRef();
  const triggerFull = () => {
    if (element.current) {
      element.current.requestFullscreen();
      if (callback && typeof callback === "function") {
        callback();
      }
    }
  };
  const exitFull = () => {
    document.exitFullscreen();
    if (callback && typeof callback === "function") {
      callback(false);
    }
  };
  return { element, triggerFull, exitFull };
};
const App = () => {
  const onFullS = (isFull) => {
    console.log(isFull ? "We are full " : "We are small");
  };
  const { element, triggerFull, exitFull } = useFullscreen();
  return (
    <div className="App" style={{ height: "1000vh" }}>
      <div ref={element}>
        <img
          ref={element}
          src="https://res.klook.com/images/fl_lossy.progressive,q_65/c_fill,w_1295,h_863/w_80,x_15,y_15,g_south_west,l_Klook_water_br_trans_yhcmh3/activities/v6bwf3e8qhdfhrgq7lv3/%EB%91%90%EB%B0%94%EC%9D%B4IMG%EC%9B%94%EB%93%9C%EC%98%A4%EB%B8%8C%EC%96%B4%EB%93%9C%EB%B2%A4%EC%B2%98%ED%8B%B0%EC%BC%93.jpg"
        />
        <button onClick={exitFull}>Exit fullscreen</button>
      </div>
      <button onClick={triggerFull}>Make fullscreen</button>
    </div>
  );
};
const rootElement = document.getElementById("root");
ReactDOM.render(<App />, rootElement);
> 전체화면 설정과 전체화면을 벗어나는 기능을 제공한다.
triggerFull() 함수는 전체 화면으로 설정하는 것이고, exitFull()함수는 callback 함수에 false 값을 제공하여 전체화면에서 벗어나게 만들어 준다.
그리고 중요한 점은, 전체화면의 대상이 될 태그에 ref={} 값을 설정해준다.
📌 useNotification
import ReactDOM from "react-dom";
const useNotification = (title, options) => {
  if (!("Notification" in window)) {
    return;
  }

  const fireNotif = () => {
    if (Notification.permission !== "granted") {
      Notification.requestPermission().then((permission) => {
        if (permission === "granted") {
          new Notification(title, options);
        } else {
          return;
        }
      });
    } else {
      new Notification(title, options);
    }
  };
  return fireNotif;
};
const App = () => {
  const triggerNotif = useNotification("Can I steal your account?", {
    body: "please",
  });
  return (
    <div className="App">
      <button onClick={triggerNotif}>Hello</button>
    </div>
  );
};
const rootElement = document.getElementById("root");
ReactDOM.render(<App />, rootElement);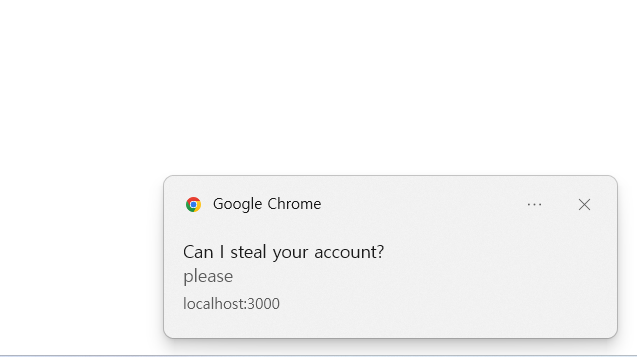
> 다음과 같이 알림을 만들 수 있다. (Title과 body 부분으로 나눌 수 있다.)
<참고 사이트>
https://developer.mozilla.org/ko/docs/Web/API/Notification
Notification - Web API | MDN
Notifications API의 Notification 인터페이스는 사용자에게 데스크톱 알림을 설정하고 보여주는데 사용됩니다.
developer.mozilla.org
📌 useAxios
import defaultAxios from "axios";
import { useEffect, useState } from "react";

const useAxios = (opts, axiosInstance = defaultAxios) => {
  const [state, setState] = useState({
    loading: true,
    error: null,
    data: null,
  });
  const [trigger, setTrigger] = useState(0);
  const refetch = () => {
    setState({
      ...state,
      loading: true,
    });
    setTrigger(Date.now());
  };
  useEffect(() => {
    if (!opts.url) {
      axiosInstance(opts)
        .then((data) => {
          setState({
            ...state,
            loading: false,
            data,
          });
        })
        .catch((error) => {
          setState({ ...state, loading: false, error });
        });
    }
  }, [trigger]);
  return { ...state, refetch };
};

export default useAxios;
> http 통신을 위해 사용된다.