
728x90
구축 환경 💻
Springboot + JSP
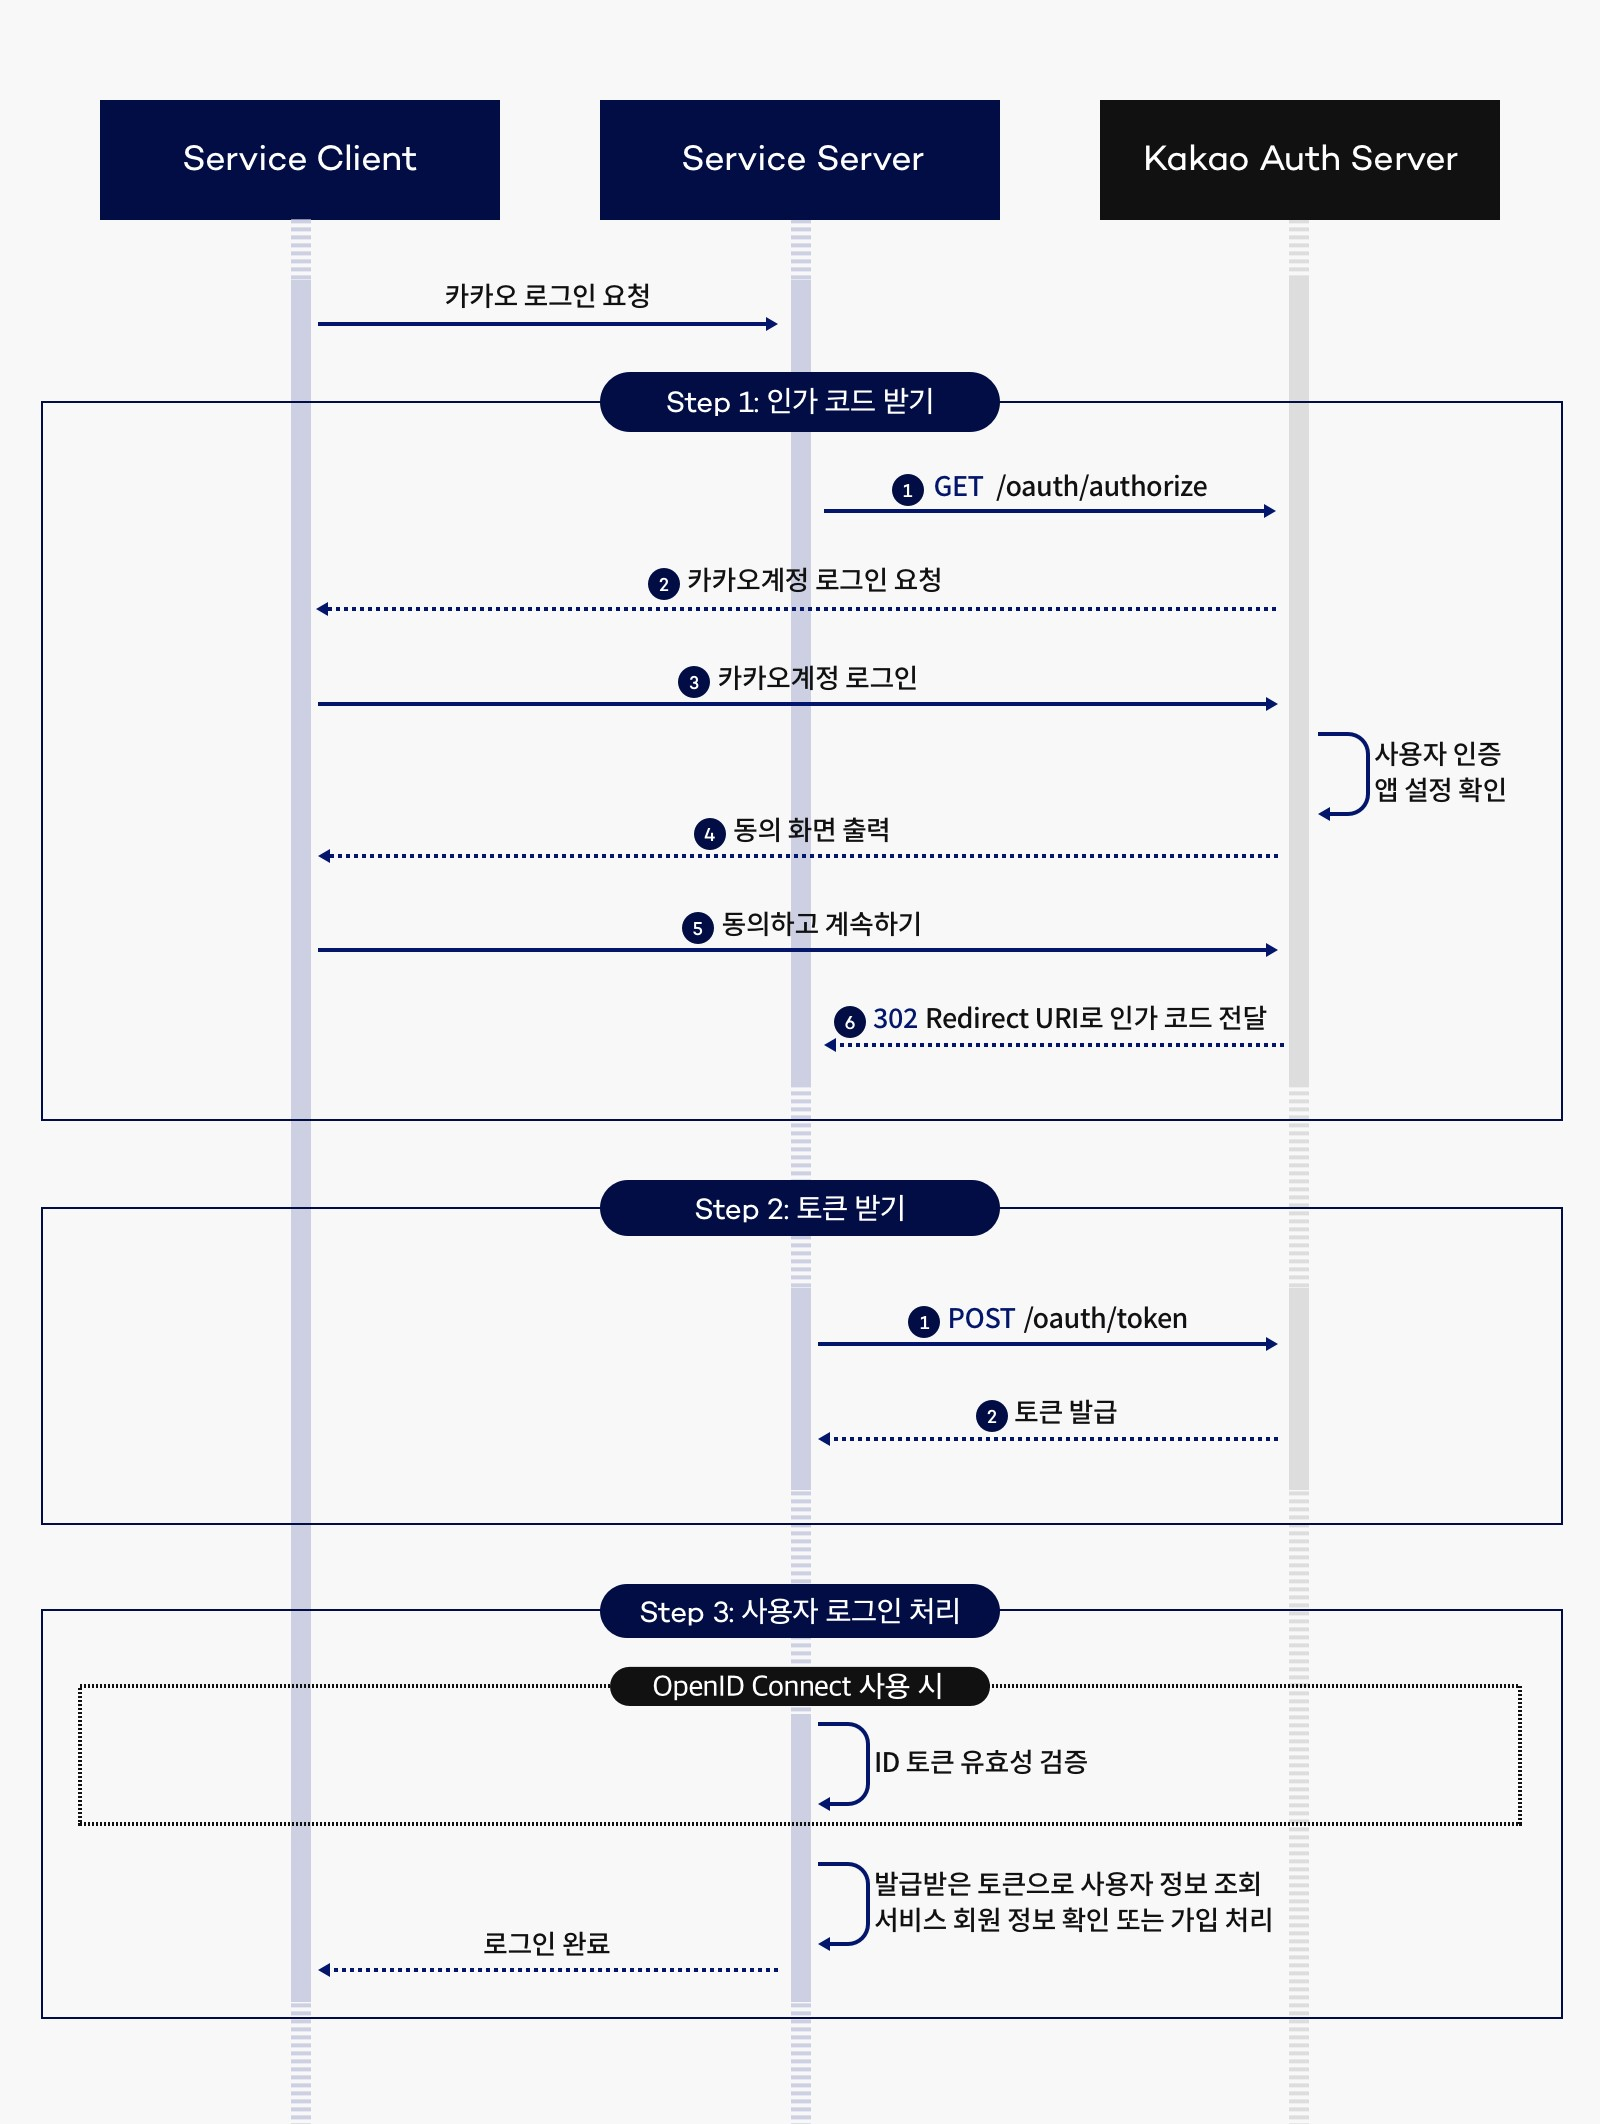
📌카카오 인증 구조 이해하기
💡 관련 개념 이해하기
REST API를 이용한 인증 처리는 어떻게 되는가?
- Service Server 는 Redirect_URI/Client_ID/Response_type 을 인증서버(Kakao Auth Server)로 전달한다. 이 때 인증서버는 Service Server의 Redirect_URI로 인가 코드를 전달한다.
- OAuth 에서 단순 인증처리를 할 땐, 인증 서버로부터 CODE 만 받으면 되지만, 리소스 서버까지 접근하기 위해서는 인증 서버로부터 액세스 토큰(Access Token)을 받아야 한다
(리소스 서버: 사용자의 정보를 지닌 카카오 데이터베이스)
⇒액세스 토큰(Access Token) 은 대리인 인증서라 생각하자. Client 의 대리인 역할을 하는 Service Server 가 Client의 정보에 접근 가능하도록 허락해주는 인증서다. - 인가 코드가 합당하다면 Auth Server에서 액세스 토큰을 전송해준다.
- Service Server 에서 액세스 토큰을 Auth Server로 전달한다면, 사용자의 정보(이메일, 프로필) 전송 혹은 회원가입 처리를 해준다.
📌 카카오 인증 실습
1) 애플리케이션 추가하기

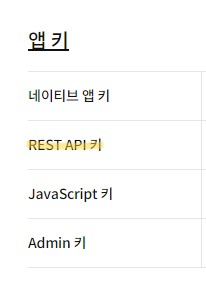
2) REST API 키 & 플랫폼 등록
 |
 |

→ REST API 키는 나중에 활용 될 수 있으므로 따로 메모장에 저장해두자
→ 플랫폼 등록) Android/ iOS/ Web 이 있으며 선택해서 사용 가능
3) 활성화 설정 및 Redirect URI 설정
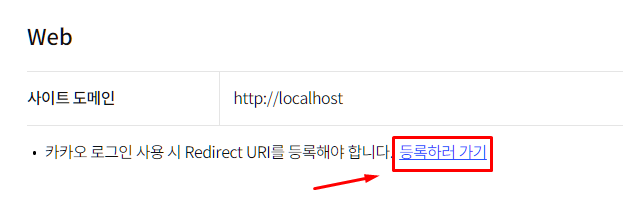
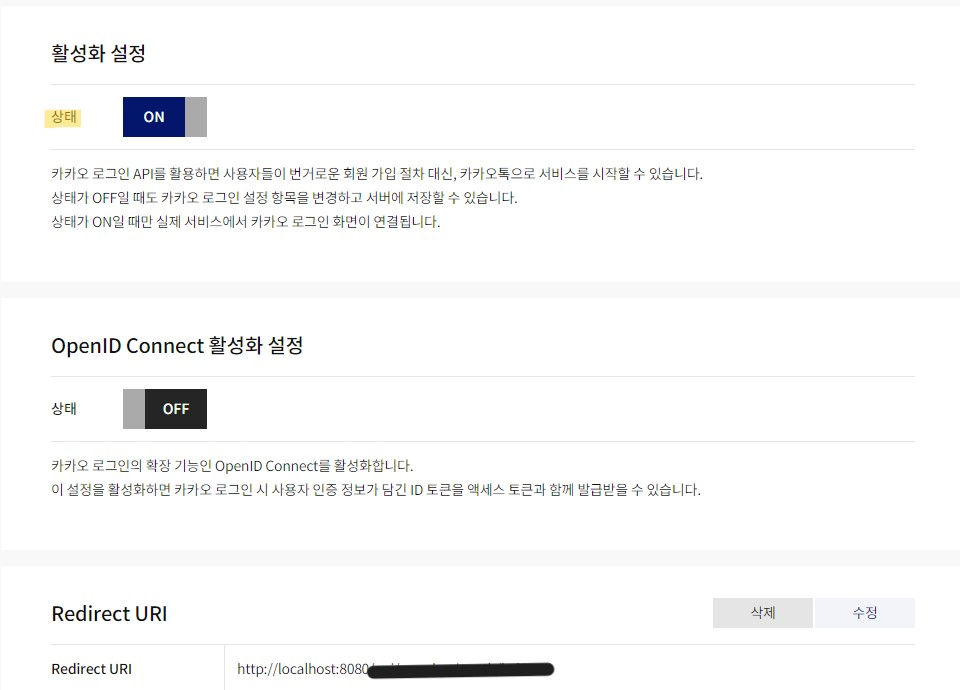
→ Redirect URI 등록하러 가기 - 활성화 설정 상태 ON
→ Redirect URI 주소를 설정
💡 OpenID 란?
카카오 로그인의 사용자 인증 기능 강화를 위한 OpenID Connect 지원
- 카카오 로그인을 통한 인증에 대해 서비스에서 신뢰할 수 있는 사용자 인증 정보 제공
- 다양한 개발 환경 지원을 위해 표준 규격에 맞춘 기능, 편리한 사용 방법 제공
OpenID Connect 사용 시 카카오 로그인 시 액세스 토큰과 함께 ID 토큰 135 추가 발급
- ID 토큰은 JSON Web Token(JWT) 형식이며 사용자 인증 정보 포함
- 서비스 세션 대신 ID 토큰을 사용하여 통합 인증(Single Sign-On, SSO) 구현 가능
4) 동의항목 설정

→ 개인정보 동의항목에 필요한 것을 커스텀하여 설정할 수 있다
✨ 카카오계정(이메일) 상태: 권한 없음 인 경우 권한 받는 방법

웹 개발 시에 이메일 정보가 필요할 것이다.
이런 경우 [신청 자격 확인] - [앱 비즈 전환 : 개인] 으로 동의를 한다면 비즈니스 인증 상태가 신청이 된다.
⇒이메일 관련 정보 요청이 가능해진다!
😉 작성 코드 보기
✔ 로그인 리소스 관련 <a>태그
  	<a href="https://kauth.kakao.com/oauth/authorize?response_type=code&client_id=${REST_API_KEY}&redirect_uri=${REDIRECT_URI}">
		<img alt="" src="/images/kakao_login_small.png" style="width:75px; height:38px;">
	</a>
https://kauth.kakao.com/oauth/authorize?response_type=code&client_id=${REST_API_KEY}&redirect_uri=${REDIRECT_URI}
✔ 토큰(Token) 받기

요청할 URL
https://kauth.kakao.com/oauth/token

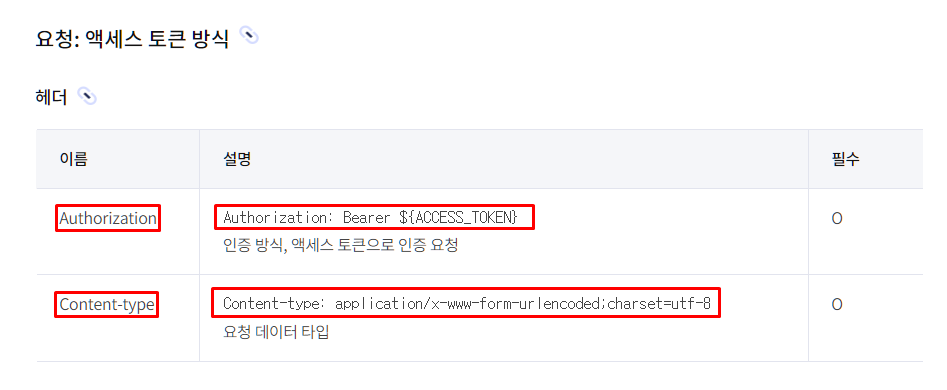
헤더에 포함 될 부분
Content-type : application/x-www-form-urlencoded;charset=utf-8
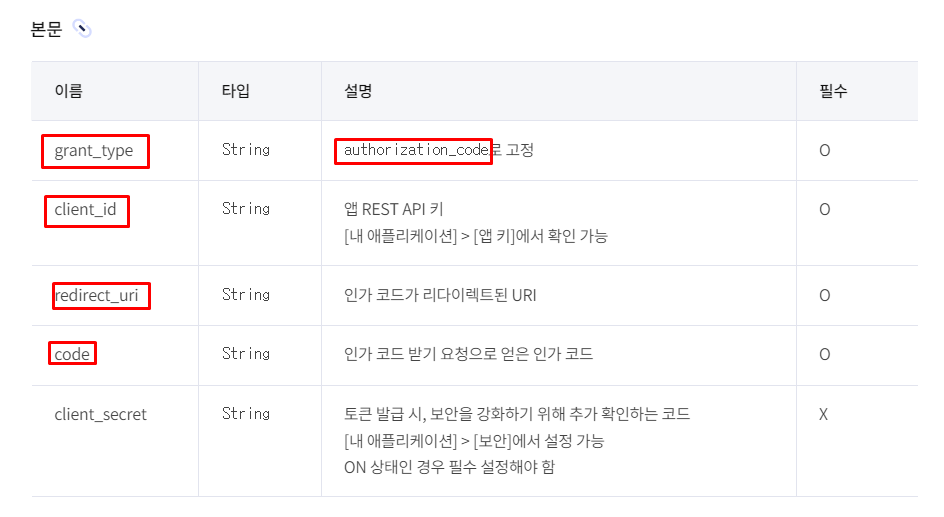
본문에 포함될 부분
grant_type : authorization_code
client_id : REST API 키
redirect_uri : 설정해둔 Redirect URI
code : 인가 코드
// http://localhost:80/user/kakao-callback?code="xxxxxxxxx"
@GetMapping("/kakao-callback")
@ResponseBody // <-- 데이터를 반환
public String kakaoCallback(@RequestParam String code) {

    // POST 방식 , Header 구성, body 구성
    RestTemplate rt1 = new RestTemplate();

    // 헤더 구성
    HttpHeaders headers1 = new HttpHeaders();
    headers1.add("Content-type", "application/x-www-form-urlencoded;charset=utf-8");

    // body 구성
    MultiValueMap<String, String> params = new LinkedMultiValueMap<>();
    params.add("grant_type", "authorization_code");
    params.add("client_id", "132465487987987"); // 할당받은 REST API Key 입력
    params.add("redirect_uri", "http://localhost:80/user/kakao-callback");
    params.add("code", code);

    // 헤더 + 바디 결합
    HttpEntity<MultiValueMap<String, String>> reqMsg = new HttpEntity<>(params, headers1);

    ResponseEntity<OAuthToken> response = rt1.exchange("https://kauth.kakao.com/oauth/token", HttpMethod.POST,
            reqMsg, OAuthToken.class);

    return response.getBody();
}
다음과 같이 요청을 한다면
아래와 같은 JSON 형태로 데이터를 리턴받게 된다.
{
  "access_token": "access_token info",
  "token_type": "bearer",
  "refresh_token": "refresh_token info",
  "expires_in": 21599,
  "scope": "profile_image profile_nickname",
  "refresh_token_expires_in": 5183999
}
✔ 받은 토큰으로 사용자 정보 요청

// http://localhost:80/user/kakao-callback?code="xxxxxxxxx"
@GetMapping("/kakao-callback")
@ResponseBody // <-- 데이터를 반환
public String kakaoCallback(@RequestParam String code) {

    // POST 방식 , Header 구성, body 구성

    RestTemplate rt1 = new RestTemplate();
    // 헤더 구성
    HttpHeaders headers1 = new HttpHeaders();
    headers1.add("Content-type", "application/x-www-form-urlencoded;charset=utf-8");
    // body 구성
    MultiValueMap<String, String> params = new LinkedMultiValueMap<>();
    params.add("grant_type", "authorization_code");
    params.add("client_id", "12346542");
    params.add("redirect_uri", "http://localhost:80/user/kakao-callback");
    params.add("code", code);

    // 헤더 + 바디 결합
    HttpEntity<MultiValueMap<String, String>> reqMsg = new HttpEntity<>(params, headers1);

    ResponseEntity<OAuthToken> response = rt1.exchange("https://kauth.kakao.com/oauth/token", HttpMethod.POST,
            reqMsg, OAuthToken.class);
	///////////////////////////////사용자 정보 요청/////////////////////////////////
    // 다시 요청하기 -- 인증 토큰 -- 사용자 정보 요청
    RestTemplate rt2 = new RestTemplate();
    // 헤더
    HttpHeaders headers2 = new HttpHeaders();
    headers2.add("Authorization", "Bearer " + response.getBody().getAccessToken());
    headers2.add("Content-type", "application/x-www-form-urlencoded;charset=utf-8");
    // 바디 x
    // 결합
    HttpEntity<MultiValueMap<String, String>> kakaoInfo = new HttpEntity<>(headers2);
    ResponseEntity<String> response2
    = rt2.exchange("https://kapi.kakao.com/v2/user/me",
            HttpMethod.POST, kakaoInfo, String.class);

    System.out.println(response2.getBody());

    // DTO 설계 하기
    return response2.getBody();
}
중요한 포인트는
1 ) "Bearer " 뒤에 한칸 공백을 넣어줘야 한다.
headers2.add("Authorization","Bearer " +response.getBody().getAccessToken()) ;
2) POST 방식으로 진행한다.
ResponseEntity<KakaoProfile> response2 =  rt2.exchange("https://kapi.kakao.com/v2/user/me",
                                        HttpMethod.POST, kakaoInfo, KakaoProfile.class);
다음과 같이 요청을 한다면
아래와 같은 JSON 형태로 데이터를 리턴받게 된다.
{
  "id": 3331228567,
  "connected_at": "2024-02-06T01:38:46Z",
  "properties": {
    "nickname": "이름",
    "profile_image": "http://k.kakaocdn.net/d.jpg",
    "thumbnail_image": "http://k.kakaocdn.net/d.jpg"
  },
  "kakao_account": {
    "profile_nickname_needs_agreement": false,
    "profile_image_needs_agreement": false,
    "profile": {
      "nickname": "이름",
      "thumbnail_image_url": "http://k.kakaocdn.net/d.jpg",
      "profile_image_url": "http://k.kakaocdn.net/d.jpg",
      "is_default_image": true
    }
  }
}
JSON 타입으로 리턴 받은 데이터를 아래 서비스를 통해서
손쉽게 DTO 클래스를 만들 수 있다.
✔ JSON 타입의 데이터 관련 DTO 생성하기 (파싱 서비스)
https://www.jsonschema2pojo.org/
jsonschema2pojo
Reference properties For each property present in the 'properties' definition, we add a property to a given Java class according to the JavaBeans spec. A private field is added to the parent class, along with accompanying accessor methods (getter and sette
www.jsonschema2pojo.org
| 해당하는 JSON 데이터 insert 후 다음과 같이 설정하기 |
 |
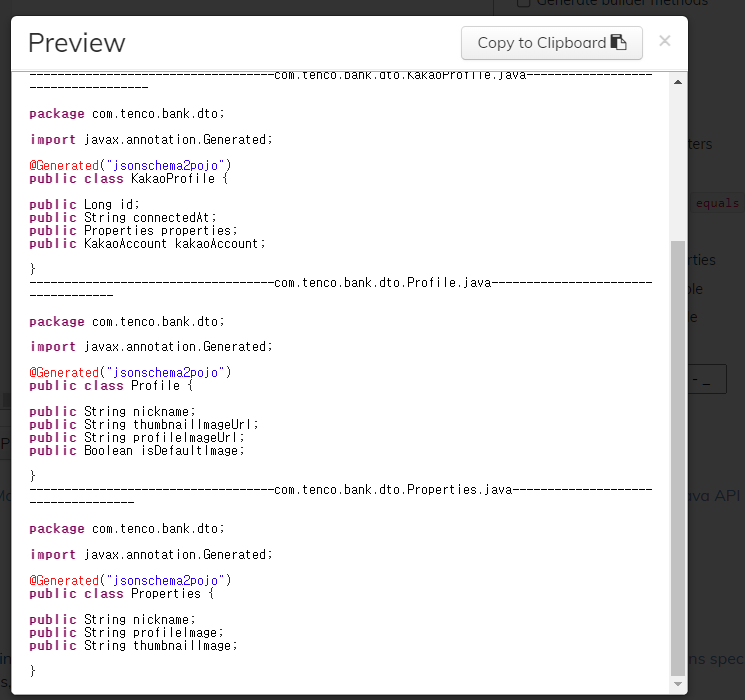

-> Preview 통해 코드 확인 가능
-> Zip 통해서 해당 코드 파일 다운 가능 - 프로젝트에 넣어주기

package com.tenco.bank.dto;
import lombok.Data;

@Data
public class KakaoAccount {

    private Boolean profileNicknameNeedsAgreement;
    private Boolean profileImageNeedsAgreement;
    private Profile profile;

}package com.tenco.bank.dto;
import lombok.Data;
@Data
public class KakaoProfile {
private Long id;
private String connectedAt;
private Properties properties;
private KakaoAccount kakaoAccount;
}package com.tenco.bank.dto;
import lombok.Data;
@Data
public class Profile {
private String nickname;
private String thumbnailImageUrl;
private String profileImageUrl;
private Boolean isDefaultImage;
}package com.tenco.bank.dto;
import lombok.Data;
@Data
public class Properties {
private String nickname;
private String profileImage;
private String thumbnailImage;
}
// http://localhost:80/user/kakao-callback?code="xxxxxxx"
@GetMapping("/kakao-callback")
public String kakaoCallback(@RequestParam String code) {

    // POST 방식, Header 구성, body 구성
    RestTemplate rt1 = new RestTemplate();
    // 헤더 구성
    HttpHeaders headers1 = new HttpHeaders();
    headers1.add("Content-type", "application/x-www-form-urlencoded;charset=utf-8");
    // body 구성
    MultiValueMap<String, String> params = new LinkedMultiValueMap<>();
    params.add("grant_type", "authorization_code");
    params.add("client_id", "72919ee7c8ec0f967c858cc03998bbc3");
    params.add("redirect_uri", "http://localhost:80/user/kakao-callback");
    params.add("code", code);

    // 헤더 + 바디 결합
    HttpEntity<MultiValueMap<String, String>> reqMsg
     = new HttpEntity<>(params,headers1);

    ResponseEntity<OAuthToken> response =  rt1.exchange("https://kauth.kakao.com/oauth/token",
                                            HttpMethod.POST, reqMsg, OAuthToken.class);
    System.out.println(response.getBody().getAccessToken());
    // 다시 요청 -- 인증 토큰 -- 사용자 정보 요청
    // Rt 만들어 요청
    RestTemplate rt2 = new RestTemplate();
    HttpHeaders headers2 = new HttpHeaders();
    headers2.add("Authorization","Bearer " +response.getBody().getAccessToken()) ;
    headers2.add("Content-type","application/x-www-form-urlencoded;charset=utf-8") ;
    // 바디 X

    // 결합
    HttpEntity<MultiValueMap<String, String>> kakaoInfo = new HttpEntity<>(headers2);

    // 요청 -- KakaoProfile를 리턴 받는다
    ResponseEntity<KakaoProfile> response2 =  rt2.exchange("https://kapi.kakao.com/v2/user/me",
                                            HttpMethod.POST, kakaoInfo, KakaoProfile.class);


    KakaoProfile kakaoProfile = response2.getBody();
    // 최초 사용자 판단 여부 -- 사용자 username 존재 여부 확인
    // 우리 사이트 --> 카카오
    SignUpFormDto dto = SignUpFormDto.builder()
                        .username("OAuth_"+ kakaoProfile.getProperties().getNickname())
                        .fullname("Kakao")
                        .password("1111") // 패스워드는 고정이다
                        .build();

    User oldUser =  userService.readUserByUsername(dto.getUsername());
    if(oldUser == null) {
        userService.createUser(dto);
        // oldUser라면 해당하는 정보를 가져와야한다.
        oldUser = new User();
        oldUser.setUsername(dto.getUsername());
        oldUser.setFullname(dto.getFullname());
    }
    oldUser.setPassword(null);

    // 로그인 처리  -- 단 최소 요청 사용자라면 회원 후 로그인 처리
    httpSession.setAttribute(Define.PRINCIPAL, oldUser);

    return "redirect:/account/list";


}
다음과 같이 DB에 저장된 것을 확인할 수 있다
728x90
'Spring > Skill' 카테고리의 다른 글
| [Spring Data MongoDB] UpdateResult 와 WriteResult의 차이 (0) | 2024.03.12 |
|---|---|
| [spring] OAuth2 네이버 인증하기 (0) | 2024.02.12 |
| [Javascript] active 값 활성화하기 (0) | 2024.02.12 |
| [spring] OAuth2 구글 인증하기 (0) | 2024.02.07 |
| [spring] Spring Security password 암호화 하는 법 (0) | 2024.02.02 |